


A good while ago (one could indeed say many moons ago), a little girl looked up into the blue sky and saw a ghostly crescent staring down at her. She was awestruck, yet perturbed to see the moon out during the day.
She swore she’d never seen it while the sun was awake. Shouldn’t the moon be sleeping?
And though the girl was old enough to know better, she truly believed, for some time, that there’d been some cosmic event that suddenly allowed the moon to stay up late.
It seemed that the heavens themselves had changed rather than the little girl. And yet, she had. She started smiling at little plants in the cracks of concrete, complimenting the flowers, embracing trees, and fancying that she controlled the wind.
One day she looked up at the nearly translucent surprise in the sky and exclaimed out loud, “Hi, Moon.” And she smiled.
When her son first gave salutations to the moon, he looked at her with a sly grin, as if it was a secret. And of course it was, for why shouldn’t you and the moon have secrets?
Her daughter played “hide and seek” with the moon. What better way to celebrate her favorite celestial body?
On occasion when the moon was sleeping in or concealing its lunar radiance, it was greatly missed. To help keep that whimsy in their lives, the family decided to an create an effigy for their empyrean friend.
What do you say, dear reader, shall we craft?


MATERIALS:
• Scissors, and snips or wire cutters
• Glue gun and glue sticks
• Wire or twine
• Handwoven or purchased grapevine wreath
• Artificial or dried flora
• Any other adornments for your moon (such as crystals, feathers, ribbon, etc.)
Step 1: If I can stress anything to you, it’s that there are many ways to make a moon. From straw bases, metal frames, paper structures—the possibilities are endless. For this tutorial we’ll use a 14-inch grapevine wreath base, which is available at any craft store (or online).
Step 2: Store-purchased wreaths generally don’t have very tight weaves. If you’re lucky enough to be able to forage and create your own wreath, or purchase a handmade wreath, this next step is not necessary. However, for our tutorial, we’ll assume you’ve purchased a storebought wreath and proceed with wrapping it tightly in wire (or yarn, twine, floral tape, etc.) to help close the gaps between the vines and make our wreath sturdier for cutting, Step 2 and for inserting artificial or dried flora. On whichever side you’d like to create a space for the opening of your crescent moon (is it a waning crescent or a waxing crescent?), wrap your wire around itself on what will be each “point” so that you leave about a 6-to-7 inch gap of grapevine without wire. (Note: If you’re working with a smaller diameter wreath base, you’ll need to adjust your gap size and opening size accordingly.)
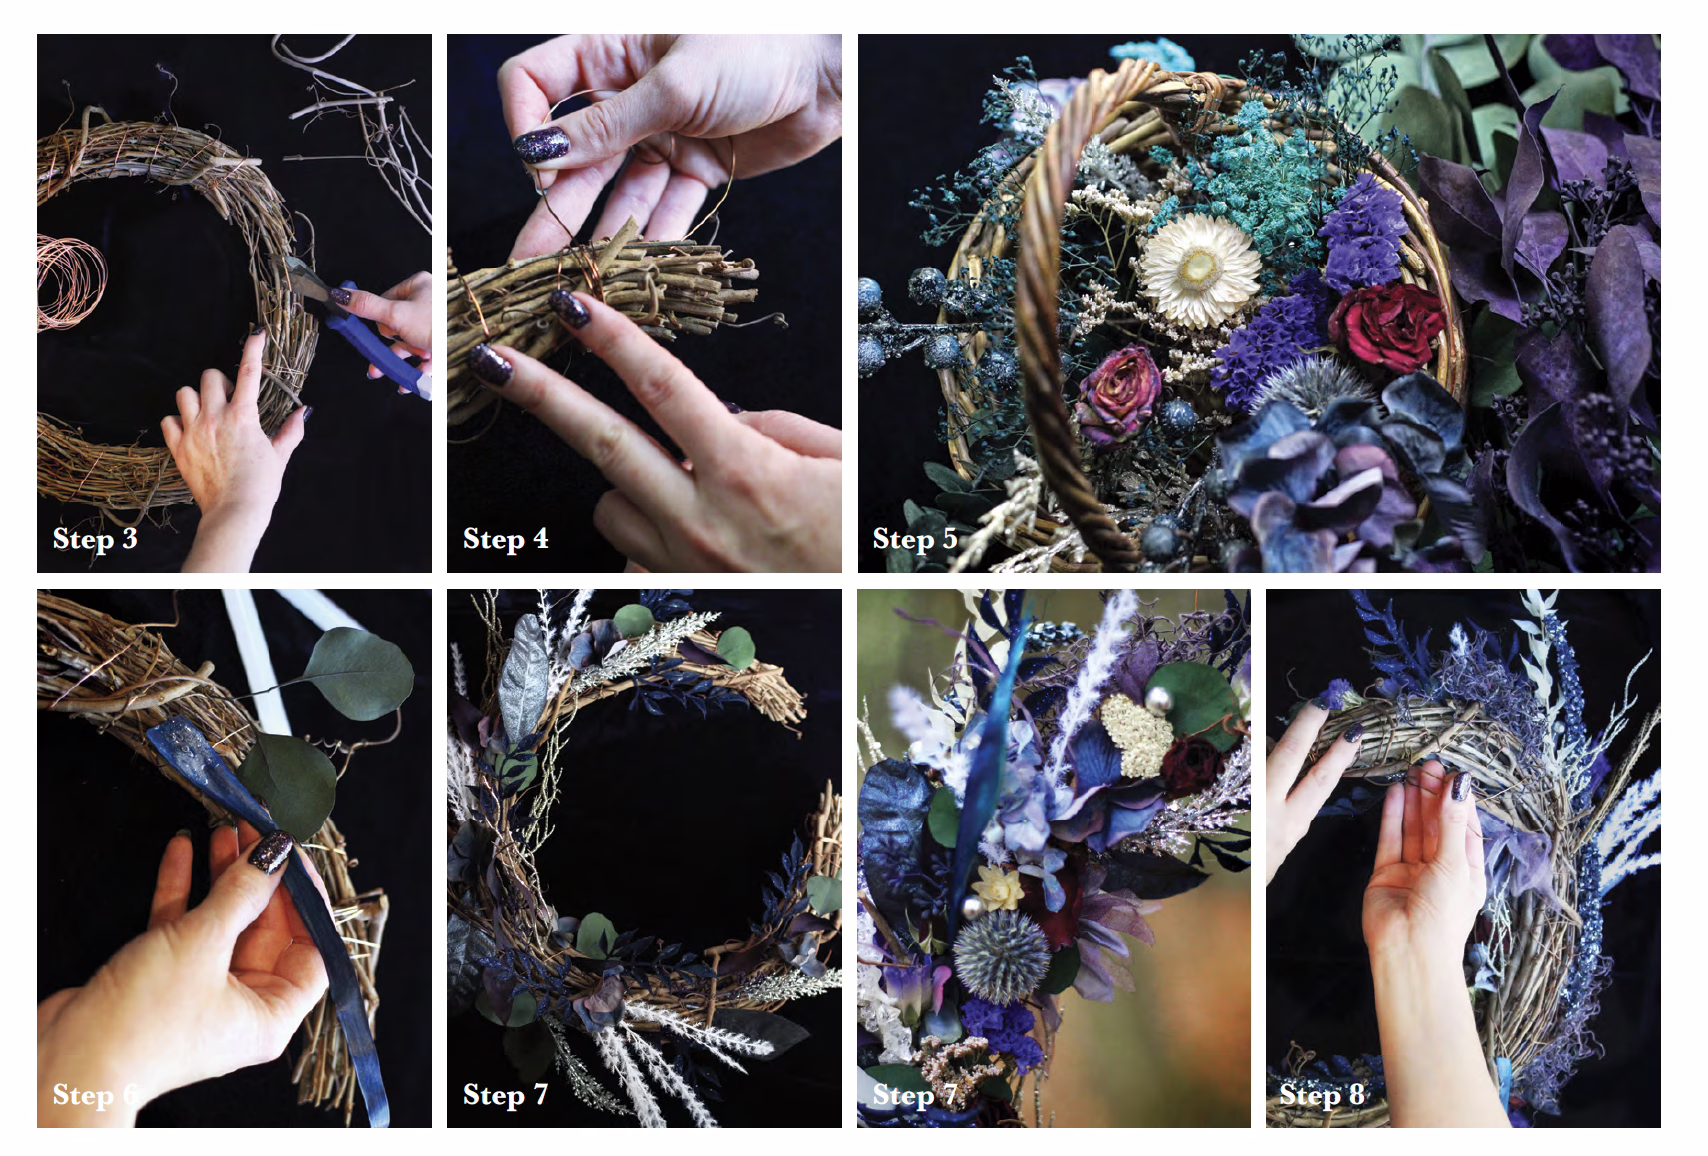
Step 3: Now grab your snips or wire cutters! Let’s make a mess! Remember that gap we left between the wire-wrapping? Cut the wreath away slowly, vine by vine. Don’t throw these pieces away (especially if they have any wild, curly vine tendrils attached), but set them aside for possible use later. They may be just the thing your moon needs in a few choice spots. We’re not looking for perfection! Uneven pieces look more natural, and a tapering point helps resemble a crescent even more so than a blunt point. You want to cut away only enough vine to have a 3-to-4 inch opening between the point ends. (If you’d prefer to skip this step and use your floral arrangements to create the sickle shape, then simply wrap your entire moon in wire and secure the wires together by twisting.)
Step 4: It’s time to reinforce the points of our moon! So grab your wire (or twine, etc.) and tightly wrap those ends. I prefer to use wire because I feel like it can be left as is and doesn’t need to be covered with moss, flowers, etc. When I use twine, I often cover it with dried (and often hand-dyed) Spanish moss.
Step 5: Now what on Earth are we going to cover this grapevine with? Truly the options are infinite. If you forage or grow your own flowers, you can easily dry them with silica gel or hang most flora up to dry. Do not feel you have to only use dried flowers. I often use a mix of artificial flowers and natural ones. In fact, I grew up helping my mother change our huge grapevine wreath every season. We used artificial flowers and would simply wedge the stems into the tight weaves of the vines. No gluing or securing with wire or tape. Since it was completely artificial flora, we could leave our wreath on our front door (purple, of course) in the elements all year. I’d reckon that wreath is at least thirty years old. Bonus: We used the same flowers repeatedly, simply in different arrangements.
Looking for artificial flora? Scour craft stores at the end of the seasons when everything is on sale. (This keeps it from going to a landfill.) Best dried flowers? My all-time favorite is yarrow—so easy to dye fun colors and to dry. Plus it also comes in beautiful colors, naturally. When Queen Anne’s lace graces the fields, I’ll pluck them, dye them, then dry them in silica. Our tutorial moon has dried rose, hydrangea, strawflower, statice, baby’s breath, heather, globe thistle, sporangia, eucalyptus, and a good deal of other randomness. Whether from personal gardens or local flower shops, the sooner you dry your flowers the better. So embrace your inner Morticia Addams and cut those (flower) heads off immediately!
Step 6: Time to heat up the glue gun! You can use other types of glue to secure your adornments in place, but I always favor a hot glue gun. Want to change your flora for the seasons? No gluing for you. Use the weaves of the vine and wedge stems into place. If you feel they aren’t secure enough, you can tie or wire them. If using a glue gun, remember a little hot glue goes a long way.
Step 7: It’s important to add your floral items in layers. The photo shows the first layer, a floral “base” of your tutorial moon. I tend to choose larger pieces to begin with and often will use artificial leaves, stems, berries, etc., at this time. Remember, you can add as much or as little to your moon wreath as you like. It’s your moon. On this first layer, if you’re hoping for a more forestlike appeal, I suggest Spanish moss sporadically glued in wild disarray, mixed with clumps of dried mosses and perhaps artificial or preserved ferns.
Step 8: Build and build, layer upon layer until you’re satisfied with how your moon looks. Grapevine wreaths are easy to hang; if the weave is tight enough, a nail in the wall will suffice. If not, a simple small piece of wire (or twine) looped around a vine in the back and twisted on itself will do the trick. How does your moon look? Concerned about any random glue spots showing (even on the backside)? Need to cover up something a little unsightly? Moss is your friend!
Worried about where to keep your new lunar companion? If you crafted with any dried flora, avoid direct sunlight and humidity. On some of my dried flowers I may use clear acrylic matte sealer spray, but the environment in which your wreath is displayed plays an important role in its longevity, so if you live in a sunny, humid clime, it’s better to hang your wreath somewhere inside the house out of direct sunlight.
Now take a step back and admire your creation! Say it with me, my friends: “Hi, Moon.”
Follow Brenna on Instagram @thewillowandthevine.

Create your own crescent moon grapevine wreath with this enchanting DIY tutorial by Brenna Mills. Using dried or artificial florals, natural textures, and seasonal adornments, this lunar-inspired craft brings celestial beauty and handmade magic into your home year-round.